Step 1: Measure the opening before you buy
-
Photo 9: Square and fasten the frame
Center the frame in the opening and screw it into place, using a level and shims to square it. Check the frame for square and make final adjustments when you install the stationary panel.
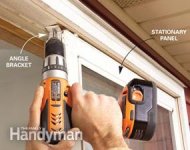
Photo 10: Tip in the glass panels
Tip the stationary panel into the opening, push it against the door frame and install any angle brackets to anchor it (Photo 3). Tip the operable panel into place and screw the inside head stop to the top of the door frame.
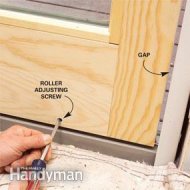
Photo 11: Adjust the door
Slide the door slightly open and adjust the roller heights until the gap between the jamb and the panel is consistent.
Installing your new slider is usually the easiest part of the job. Be aware that every manufacturer has slightly different weatherstripping systems, handle and lock hardware, and ways to fit the doors into openings, so they may not exactly match the ones shown in our photos. Read and follow the door instructions for those details.
If you have a “knockdown” (not preassembled) door frame, assemble it on the deck, garage floor or other flat surface. “Dry-fit” the assembled door frame in the opening to make sure everything fits (Photo 8), then rest it flat and put two beads of silicone caulk on the underside of the sill (where the directions call for it).
 Slip the door frame back into the opening and push the door fins tight against the sheathing (Figure A). (Line the fin groove up flush with the outside of the sheathing if you're not using fins.) Center the door frame in relation to the siding or trim. Otherwise it'll look bad from the outside. Then plumb, shim and screw the door in the opening (Photo 9) following the manufacturer's instructions. Be sure not to bow the jambs in or out when you drive the screws.
Follow the instructions to install the stationary panel first and then the slider. Tip the stationary panel into the opening and slide it within about 1/4 in. of the side jamb, and make sure the gap is even top to bottom. If it's more than 1/4 in. out of plumb or the jamb bows, adjust the frame for plumb and straightness and adjust the shims if necessary.
 Install angle clips, weatherstripping and trim as needed.
Then rest the sliding panel wheels on the tracks and tip the panel into the opening. Have a helper hold it in place while you screw in the head stop. Slide the door about 1/4 in. from the frame and check the gap from top to bottom. Raise or lower the rollers at the bottom. Adjust the rollers until the gap is even and the door rolls freely (Photo 11). Finish up by installing the handle and the locking hardware.
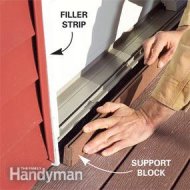
Photo 13: Add filler strips
Cut filler strips to fit between the door frame and the siding with a 1/8-in. gap on both sides, then fill the gaps with silicone caulk. Cut a threshold support block to fit between the deck and the siding, then slip it into place and nail it.
You'll frequently be installing a door that's smaller than the one you removed. This will leave a wider gap that you'll have to fill with exterior trim. Match the new trim to the existing as much as possible. Whatever...


